How to set-up linkedIn Ad campaign step-by-step guide
1. Create an Ad account.
If you already have created your LinkedIn Ad Account then you can skip to the next step.
Like other social media marketing platforms, you have to create an ad account on LinkedIn to organize and analyse all your campaigns without affecting the content on the company page.
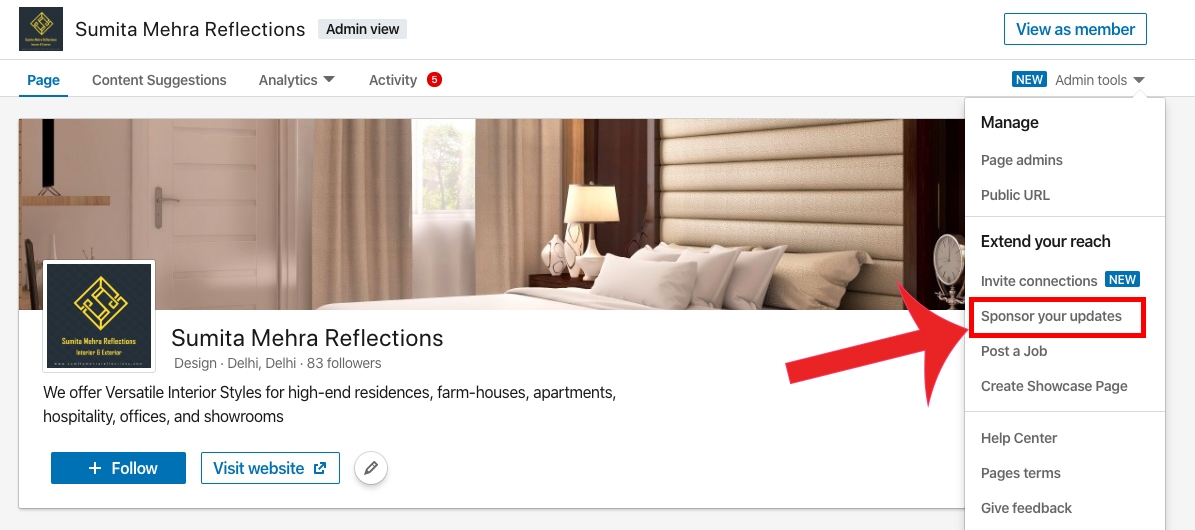
To create an ad account, open your company page & navigate to the “Admin Tools” menu on the top right corner below the “View as member” button.
Now choose the “Sponsor your updates” option from the dropdown menu.
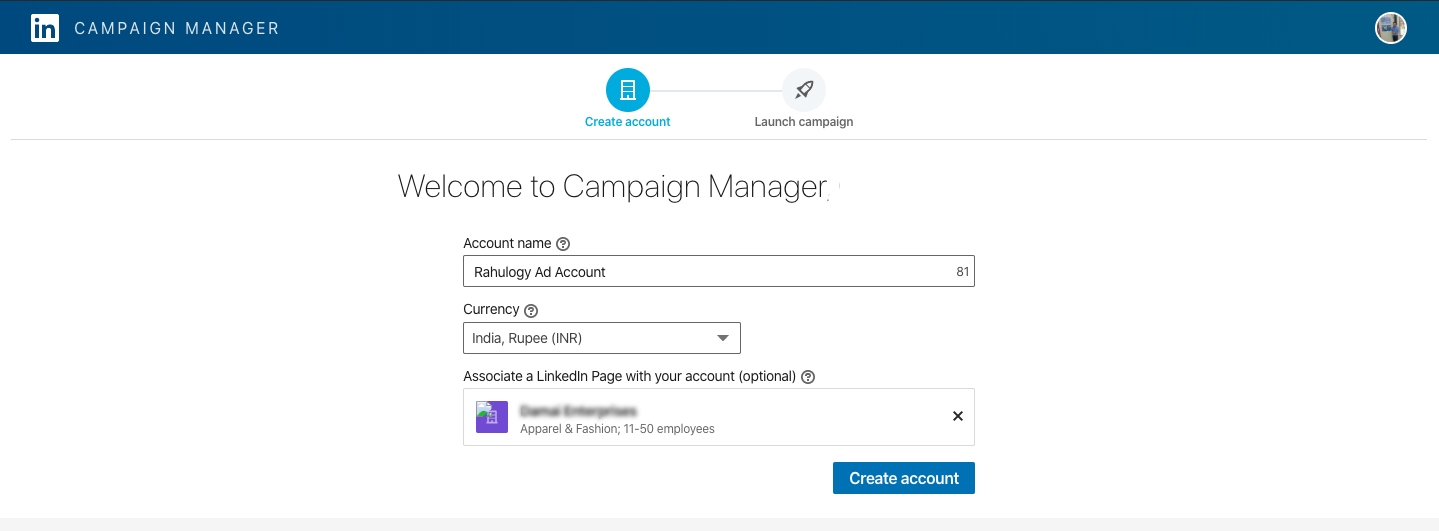
Now, you’ll be taken to the campaign manager page with an account opening form where you will have to assign a name to your ad account, choose currency & associate your respective company page.
2. Select your objective.
In this step, you’ll have to decide what you want your audience to do when the ad appears on their news feed.
According to LinkedIn, “choosing an objective helps them customize your campaign creation, deliver the best ROI for your stated goal, & show you relevant reporting”.
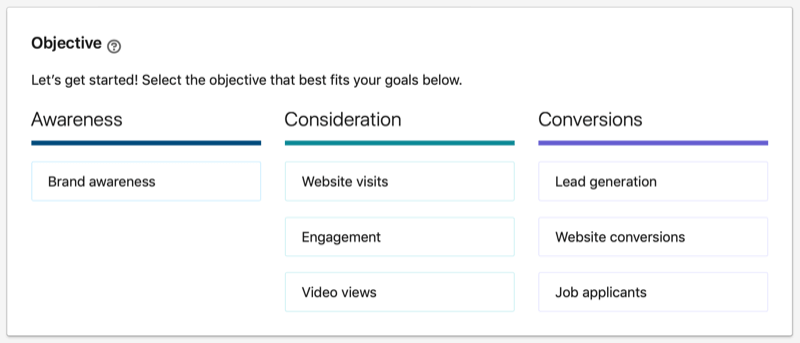
LinkedIn Campaign Objectives are categorized into 3 sections based on the buyer’s journey – Awareness, Consideration & Conversion.
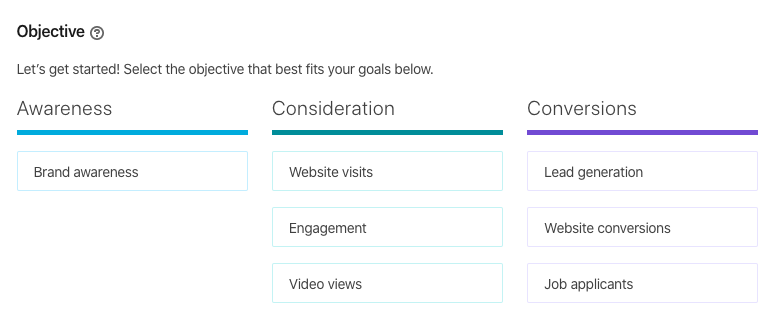
Under these categories, the following are the objectives –
- Brand Awareness: Choose this objective to reach more people just to tell them about your product, services, or company
- Website Visits: Choose this objective to reach people who are most likely to click on your ads to visit your website or marketing landing pages.
- Engagement: Choose this objective to show your ads to people most likely to engage with your ad or follow your company.
- Video Views: Choose this objective to show your videos to people most likely to watch them.
- Lead Generation: Choose this objective to show your ads to people most likely to fill out a lead generation form.
- Website Conversion: Choose this objective to show your ads to people most likely to take the actions on your website which are valuable for your business.
- Job Applicants: Choose this objective to show your ads to people most likely to view or click on your job ads to apply.
Now, evaluate the goals you want to achieve from the campaign and choose the most relevant objective.
3. Create an audience.
In this step, you will have to create an audience you want to target through your ad.
LinkedIn allows you to target your potential customers on the basis of various attributes like Education, Campany, Profession, Skills, and many more.
LinkedIn has also listed a bunch of audiences based on different audience attributes. If you’re a first-timer, you can choose one of the relevant audiences for your campaign.
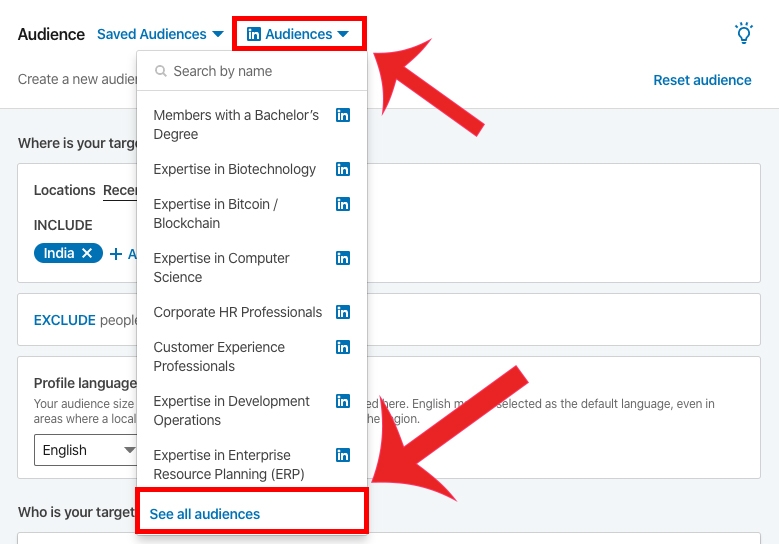
On selecting your audience, LinkedIn automatically narrows down the audience and creates an audience by adding relevant audience attributes like job roles, group members, education, skills, etc in respective sections.
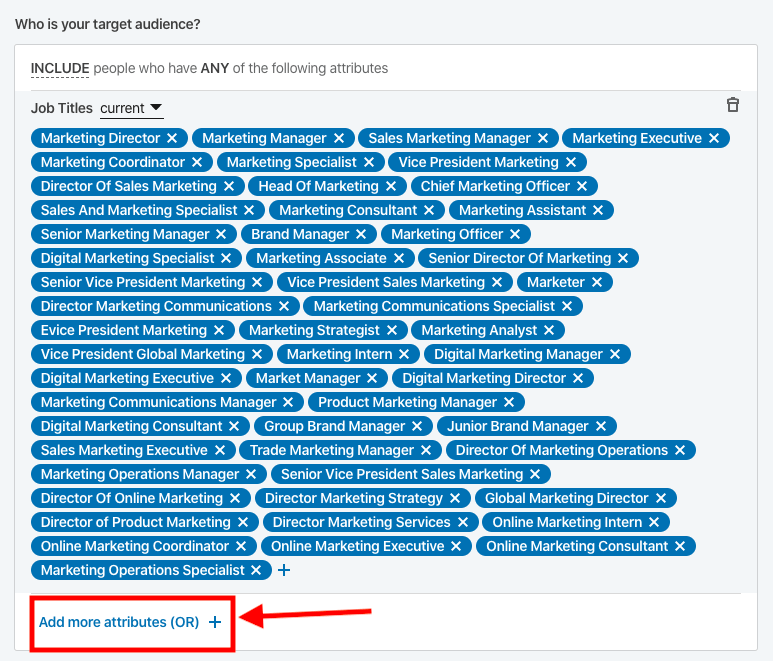
Additionally, you can add more attributes to the target audience to expand your reach further by clicking on “Add more attributes (OR)+”.
LinkedIn Audiences can save you a lot of time as you probably have to make little or no changes to the audience attribute and you can move to the next step directly.
However, if your target audience is not listed on LinkedIn Audiences, you can target them based on the specific & relevant audience attributes for the campaign.
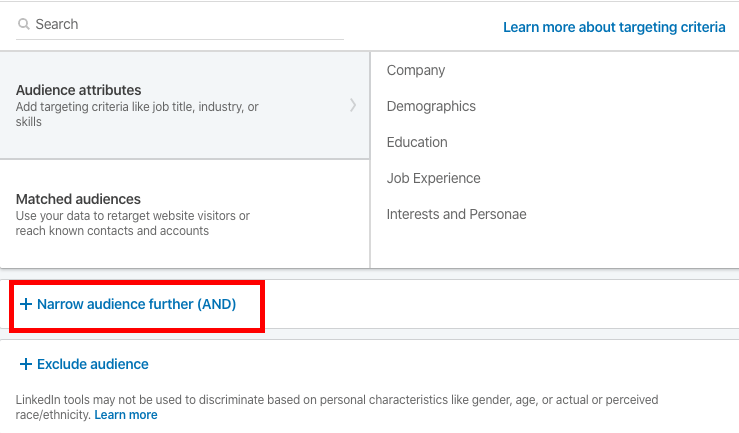
The best part is LinkedIn allows you to narrow down your target audience as much as you can. So, avoid a wide targets & narrow down your audience to reach your most relevant prospects.
Pro tip: Once you’ve created your audience, always save it so that you can use it again & skip this step in future campaigns.
4. Choose an Ad format:
On the basis of your campaign objective, choose of the relevant ad format.
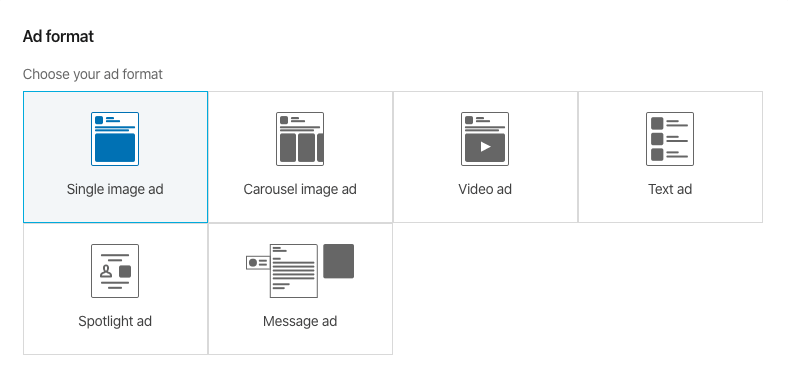
LinkedIn offers you the following 8 ad formats in total but only the relevant ad formats based on your campaign objective will be listed.
- Single Image Ad: Choose this ad format to create an ad using a single image that will show up in the news feed.
- Carousel Image Ad: Choose this ad format to create an ad with two or more images that will show up in the news feed.
- Video Ad: Choose this ad format to create an ad using a video that will show up in the news feed.
- Text Ad: Choose this ad format to create text-based ads that will show up in the right column or top of the pages on LinkedIn.
- Spotlight Ad: Choose this ad format to create ads that are personalized using profile data to promote an offering throughout the desktop.
- Follower Ad: Choose this ad format to create ads that are personalized using data to promote your company page on the desktop.
- Message Ad: Choose this ad format to create ads that are delivered to your target audience’s LinkedIn Messaging inbox.
- Job Ad: Choose this ad format to create ads that are personalized using profile data to promote jobs throughout the desktop.
Before making any decision on which ad format to choose, you can click on each format available to see the “Forecasted results” on the right sidebar.
Analyzing this data can help you choose the most relevant ad format on the basis of your campaign budget & the target to achieve.
Now, analyze, compare & choose the ad format you want to go ahead with.
5. Set up ad budget & schedule.
Now, you can choose to set up a daily budget or both a daily & total budget from the drop-down menu.

Setting up a campaign budget is very crucial to make sure you’re in control of spending the budget & it doesn’t exceed the pre-defined campaign budget.
After that, you have to decide whether to run the campaign continuously from the start date or schedule the start & end date. In case of choosing to run the campaign continuously, you have to stop the campaign manually.

6. Select a bid type.
At this step, you have to choose how you want your ad budget to be spent. LinkedIn offers the following 3 types of bidding –
1) Automated Bid – This allows LinkedIn to set your campaign’s bid automatically based on historical campaign data and member information.
You can choose this option when you’re not sure how much to bid. Also, this is charged by impressions, not by clicks.
2) Enhanced CPC Bid – This gives you control to set the bid yourself & you’ll be charged only if someone clicks on your ads.
You can set the maximum bid amount you want to pay per click and you’ll not be charged for more than that.
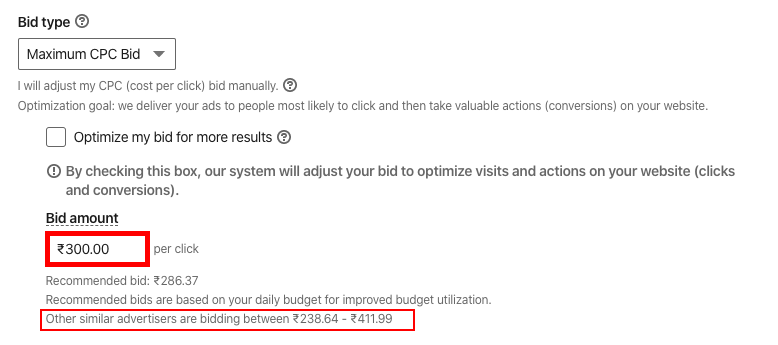
However, if there are more advertisers bidding on a similar campaign, the bidding will be higher & if your bidding amount will be lower than other advertisers, your ads may not ever appear on LinkedIn feeds.
So, make sure that you consider the recommended bid amount by LinkedIn which is based on other advertisers’ bidding.
3) Maximum CPM Bid – In this bidding, you’ll be charged an amount each time your ad appears every 1000 times on a LinkedIn feed.
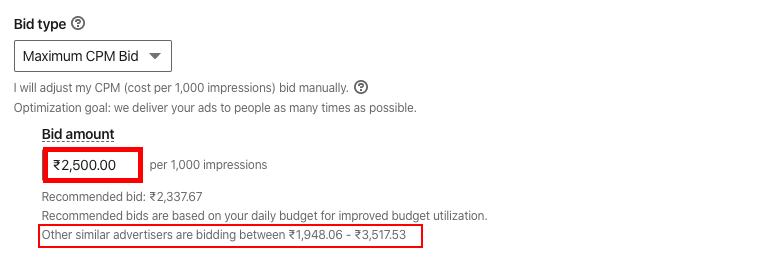
Like CPC bidding, you’ve to set a bidding amount for this as well. Also, this option will be unavailable if you’ve selected the LinkedIn Audience Network option in the placement section.
Now, deciding the most suitable bidding option can be tough for your campaign depending on the end goal you want to accomplish from the campaign.
So, here’s my tip for you – If you want your ads to be seen by maximum people, CPM will be the best option, whereas if you want your audience to take action on your ads like visiting website pages, downloading resources, filling form, etc then you should choose CPC bid type.
7. Set up conversion tracking.
Now, LinkedIn Ads allows you to measure the actions your audience takes on your website after clicking or viewing your LinkedIn ad by adding Conversion tracking in your campaign.
Conversion tracking is an optional step in the process of setting up the campaign but it can be very helpful for you to understand how people engage on your website after clicking the ad.
But, in order to leverage this option, you need to place the LinkedIn Insight Tag on your website. And here’s how you can do it – Add the LinkedIn Insight Tag to Your Website

If you have placed the Insight Tag on your website, click on the “+Add conversion” button and a pop-up window will appear where you’ll have to name your conversion, enter your settings & define how you’d like to track your conversion.
In order to understand this better, you can refer to this guide to set up conversion tracking – How to set up LinkedIn Conversion Tracking
After setting up the conversion tracking, click on the “Next” button but before that make sure that you choose the right objective and ad format because once saved, you cannot change it.
8. Create ads for the campaign.
Finally, you’ve to add the ad in the campaign for which you can create an ad or sponsor existing posts on the page.
To sponsor the existing post, click on the “Browse existing content” button, select the post you want to promote & then click on the “Sponsor” button above the preview bar.
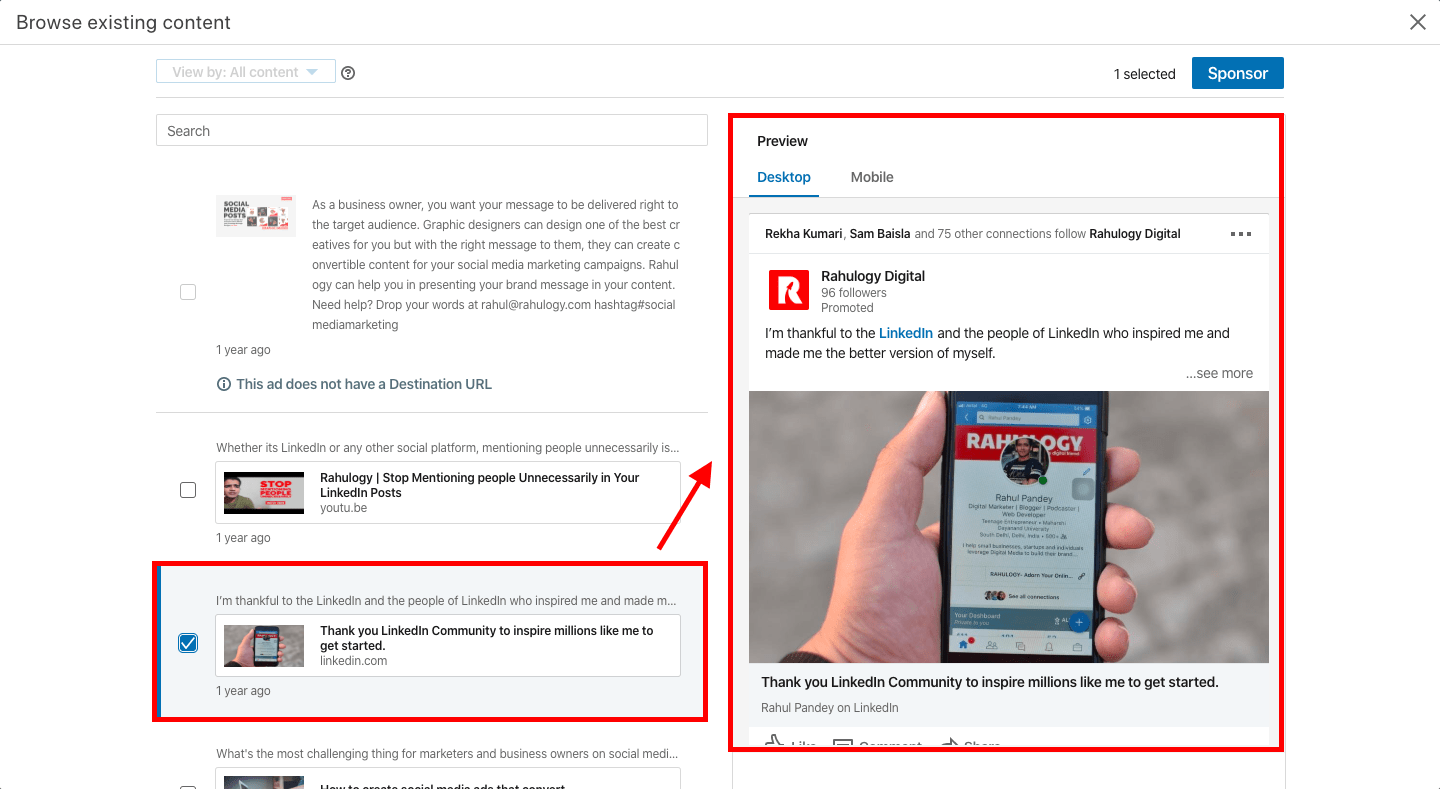
Yes, it’s that simple!
But if you want to create a new ad, click on “Create a new ad” and then a new pop-up window where you’ve to name the ad, add introduction text, destination URL, image, header and choose a CTA for the ad.
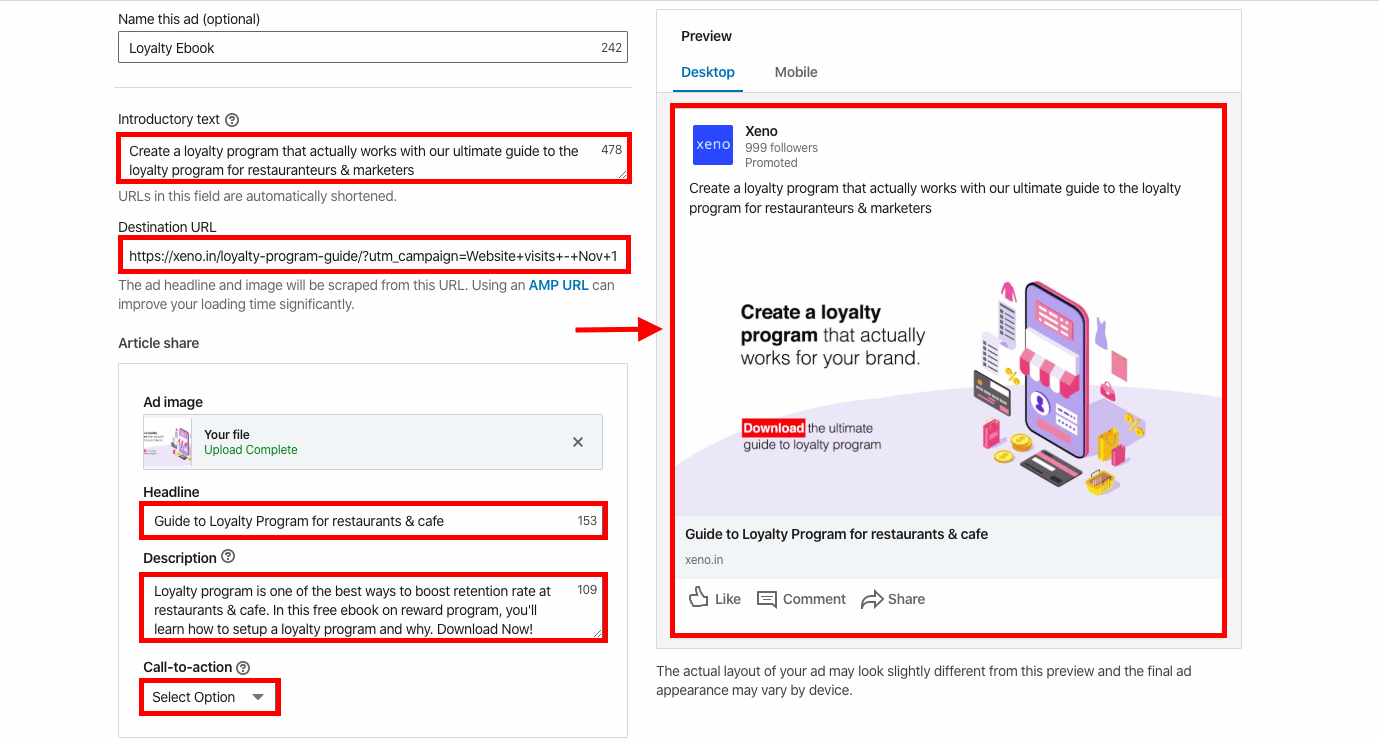
After filling up every section, click the “Create” button & your ad is ready to go live.
Lastly, click on the “Next” button & then the “Launch” button on the next page to get the campaign live. Now your ad is live but does not expect it to start delivering at the same time as LinkedIn may take some time to review it and once approved, the ad will start appearing on your targeted audience’s feed.
Now, this guide gives you every bit of information you need to set up your LinkedIn ad campaign. So, what are you going to run your first campaign for?
